Servo extension leads
All servos have one thing in common, usually the attached lead is too short for our installations. In this short article I'll be looking at that unsung hero of our installations - the extension lead, and with some basic equipment, how to make your own.
Servo extension leads can be purchased from most retailers but in my experience, only in limited pre-set lengths. Now while these are perfectly fine for most people, if like me, you have to have things 'just so', then why not make your own?
Now servos are a key part in our set-up and the loss of power and/or signal could spell disaster so with that in mind please only attempt to make your own leads if you have:
- The correct tools
- The knowledge and confidence to do so
- Practiced the technique
Practice! I hear you say? Well yes, we've all at one time or another practiced our flying, or a musical instrument, so why should building skills be any different? Most good techniques develop through years of experience to the extent that we forget when they were first learned.
Why make your own? Well not just to save money, in fact the initial first few will cost more than the ready-made alternatives essentially through having to buy the tools and materials required. For me it's a case of having the correct length for the run, and as we will see later, the correct plug/socket to make life easier at the patch.
View Details
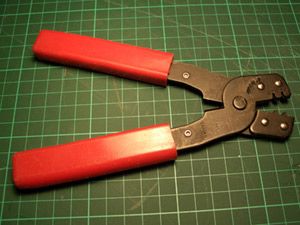
There are a few on the market to choose from, the one used here is a budget one from Al's Hobbies. It comes from their starter kit which includes a special crimping tool, 10 Male plug ends, 10 Female plug ends and gold plated pins, but no cable!
View Details
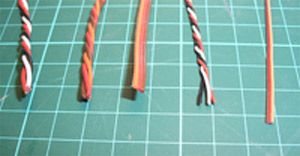
There's plenty of cable to choose from, try and match the thickness to that of the servo. If in doubt go large, not small.
I prefer to use heavy gauge for all runs to the servo as I believe that the extra weight penalty is more than compensated for by knowing that there will be enough 'oomph' to drive my servos. The only exception is for light weight foamies where I match the servo wire. I do have a favorite in the heavy gauge twisted type and will demonstrate why when we start to make our leads.
Plugs and sockets - there are many suppliers for these but buy those that match your equipment, if in doubt use JR as they are more universal (see list at the end).

View Details
First, measure the length of extension you will need, if it's for wing mounted ailerons then cut 2 lengths the same. I tend to make one end, fit it to the servo and then make off the other end to suit, with a little bit of slack.
Once you have your length, unravel the wire or tear the strands apart so you have some (small) length to work with. This is where the twisted cable comes into its own in that you can unravel more than you need knowing that you can twist it together again.
Strip back the insulation to reveal 5mm (varied slightly depending on the terminals used) of wire, and lightly twist the core together with your fingers. Now comes the tricky bit where until you have done a few, you might think you don't have enough hands.

View Details
Decide if the end you are wiring is a plug or socket and use the correct terminals.
You have to offer the wire to the terminal, and offer the terminal to the crimp tool and crimp in one fluid motion. I find it best to gently pre-crimp the terminal so the insulation is a friction fit on the terminal, this way I can concentrate on the actual crimping.
The terminals have 2 different grips, strain relief for the insulation and electrical joint for the wire, it is important that you insert the wire such that each is in it propper position, as shown above.
What you are looking for is the bare wire section in the middle of the terminal with the insulation butting up behind it. The crimp tool excerts such a high local pressure that the wire is effectively cold welded to the terminal, any insulation in this area will reduce the effectiveness of this connection and may cause the joint to fail. If you do accidentally get the insulation crimped in the wire area, cut it off and start again.

View Details
Using light pressure, pre shape the terminal to hold the wire in place
Care must be taken to insert the terminal into the crimp tool the right way round, (refer to the instructions that come with your crimpers). Once you have applied full pressure which usually means squeezing the crimp tool together as hard as you can, the terminal will be very tight in the tool, some gentle easing is required to release the terminal and once out, give it a good tug to check it is secure.
Better quality crimp tools have a ratchet that you have to squeeze beyond to release the crimp head, this ensures that enough pressure is applied to make the termination properly.
Do the other 2 terminals taking care that they crimp the wire in the same place, again this is where the twisted cable has an advantage in that if you do have the terminals with slightly different lengths then its easier to hide the fact that with the straight bonded wire.
Fit your plastic plug casing to suit, taking care to insert the terminals, not only in the right positions (refer to an already wired servo lead here) but also the right way round so that the catch on the case engages with the terminal. Give a final tug to check security.

View Details

View Details
This is where being able to make your own leads really comes into its own. A lot of models these days use a servo in each wing, which means 2 sets of servo wire to go into the receiver, imagine having a servo for each aileron and flap, that's 4 sets of servo wires (12) wires!
The answer is a single multi-way connector from Ashrek. These amazing devices come in a range of sizes and I regularly use the 6-way ones while my Star F3B glider has a 12-way unit for the multi-servo wing.
What you do is remove the terminals from your servos (unfortunately they are not compatible with the Ashtek cases) and follow the instruction above.
You will end up making a little loom to convert the multi-way plug into singles for the Rx end, and that's it - one plug at the patch and no worries that you might be getting everything the wrong way around.

View Details
Another benefit of making your own leads is being able to use common power leads and individual signal leads. Look at the Ashtek plug on my E Blaster and you can see I have 4 wires, +ve, -ve and 2 signals.
Remember that if the plug joiners are partway down a fuselage or inside a wing then I'd recommend someway of holding the join together - cable ties, sticky tape or bespoke items, again, such as those available from Ashtek.
I've also rewired servos and just terminated with a plug, but care must be taken when dismantling a servo. Be aware also that you may void any warranty in doing so.
Filters - Long cable runs can, in some circumstances, pick up noise which can find its way into the receiver and cause glitching. A common method to eliminate this is to use ferrite rings at the receiver end. Wrapping the servo wires around ferrite cores a few times cancels out this noise. Its easy to fit ferrites before you fit the cases but don't forget to leave extra cable for the ferrite when cutting the lengths.
.
.